


Wednesday, August 31, 2011
Tuesday, August 30, 2011
Photo Challenge: White
Here's Christian inspecting a crayfish skeleton found on a dried up river bottom in Montana. This is my entry to this week's I Heart Faces Photo Challenge: White. Read the rest of the story in my earlier post.


Friday, August 26, 2011
Huckleberries!
We managed to hit huckleberry season perfectly two years in a row. Just returned from our second trip up Graves Creek to pick huckleberries. We hit the jackpot today. Just look at these loaded bushes!


Found this beautiful mountain spring along the way.

Elsie, Anna and I made a delicious pie from the huckleberries we picked on Tuesday. I'm thinking about making some jam with the ones we picked today.


Today's huckleberry team consisted of my niece Elsie,

Christian, Anna and me.

Found this beautiful mountain spring along the way.

Elsie, Anna and I made a delicious pie from the huckleberries we picked on Tuesday. I'm thinking about making some jam with the ones we picked today.

Elsie's Simple Sweets: Chilled Fresh Huckleberry Pie
On Tuesday, our huckleberry-picking crew (Ehren, Christian, Anna, Elsie, Ethan and I) picked plenty of berries for a pie. Elsie and I found this absolutely delicious blueberry pie recipe in an old Betty Crocker cookbook and made it with our fresh Montana huckleberries. I don't even like blueberry pie, but I loved this recipe!
Chilled Fresh Huckleberry Pie
1 empty 9-inch pie crust (bottom crust only) baked
2 c fresh huckleberries (or blueberries)
1/2 c sugar
3/4 c water
1 Tbsp plus 2 tsp cornstarch
1/4 tsp cinnamon
1/4 tsp salt
2 tsp fresh lemon juice
1/4 c grenadine syrup
whipped cream
Pour the fresh, cleaned huckleberries into the empty pre-baked pie crust. In a saucepan, mix together the sugar, water, cornstarch, cinnamon and salt. Boil for one minute, stirring constantly. Remove from heat and stir in the lemon juice and grenadine syrup. Pour the mixture over the blueberries and chill for one hour. Top with whipped cream and serve.

Did I forget the most important step?
Sneaking a few berries before you make the pie.

While baking, Elsie and I were discussing the fictional bakeshop called "Nellie's Simple Sweets" from the Courtship of Nellie Fischer, a series of books by Beverly Lewis. We both recently read this series.

Wednesday, August 24, 2011


I'm Going to the Minnesota Blogger Conference!
I've never attended a blogger conference before, but I got a ticket to Minnesota Blogger Conference this morning...

...on a borrowed iPhone.
...after turning Javascript off so I could type {the site tried to validate every keystroke, and Safari mobile would not let me type}.
...after turning Javascript back on to submit the registration form {the submit button used javascript}.
Thank goodness I'm not just a blogger, but a programmer too. I'm telling you Eventbrite, start using jQuery instead of JavaScript already! Anyway, by some miracle, I didn't lose my hold on the ticket, and I'm going! Can't wait to see you there Cari and Bonnie {and hopefully Erin}.
{Now, I just have to start blogging again.}
Tuesday, August 23, 2011
Rising Waters
Not long after we arrived at my sister's, the river water started rising. We were lounging at the "beach" with our chairs half in the water while the kids played. We noticed our chairs seemed to be "sinking." "Do you think the river's going up?" someone asked. We planted a stick in the water to see if the water was rising. It was, and fast. It took just over 24 hours to return to normal. Good-bye river-bottom explorations, easy-to-catch fish, and sandbar beaches. Hello dock, boat and water skiing.
August 21, 5:35 pm

August 22, 8:56 am

August 22, 6:23 pm

August 23, 5:07 pm

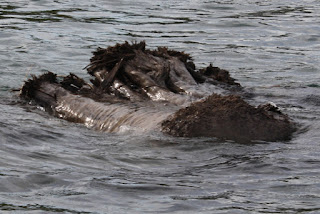
As you can imagine, there was a lot of debris making its way downstream after the water rose so quickly -- like this giant stump picked up by the rising waters. So while the dock could go in immediately, the water skiing had to wait a few days...
August 21, 5:35 pm

August 22, 8:56 am

August 22, 6:23 pm

August 23, 5:07 pm

As you can imagine, there was a lot of debris making its way downstream after the water rose so quickly -- like this giant stump picked up by the rising waters. So while the dock could go in immediately, the water skiing had to wait a few days...

Monday, August 22, 2011
The Beach
While the river ran low, some nice new beaches appeared.

And some wells were dug.

Or were they mud baths?

Little girls were buried in the sand.

And so were some big girls.


And some wells were dug.

Or were they mud baths?

Little girls were buried in the sand.
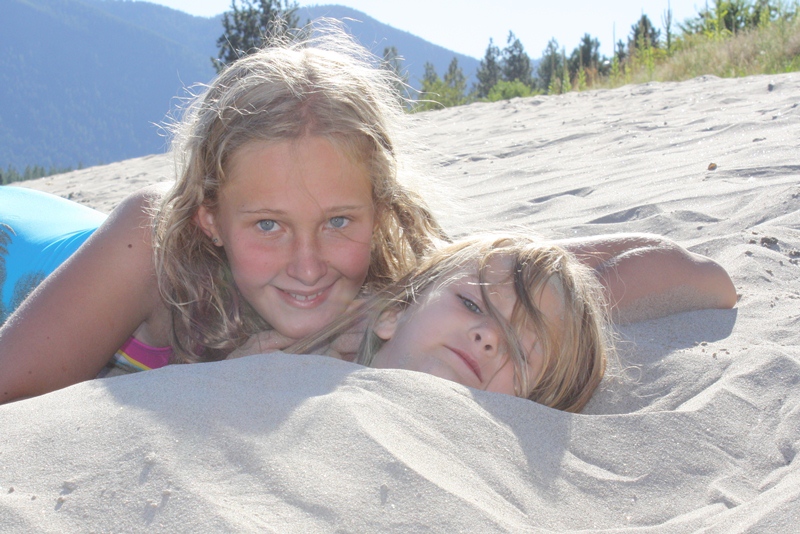
And so were some big girls.

Reaping the Bounty
While the river waters were down, the fishing was up.

Here are Ethan and Ehren with one of the four-pound Northern Pike caught today.

The fish were concentrated into a significantly-reduced volume of water, and the boat launch was closed. If you were fishing from the banks or if you were creative enough to get a small boat into the water, the bounty was yours for the taking.

Ethan had ample opportunity to practice his newly acquired skill: filleting fish. He's pretty talented for a guy who just turned ten.

Sunday, August 21, 2011
Exploring the Remains
This spring, the water on the river near my sister's house was so high, they literally had to "break" the nearby dam to move enough water through. This left the reservoir above the dam nearly empty all summer while they worked to repair the dam. The water was at its natural level, not seen for nearly 100 years.
When we arrived, it was fun to explore never-before-seen {by us} river bottom. The gray rocky slope is the area that is normally underwater.

Crayfish skeletons were abundant.

Ancient tree stumps protruded from the original banks of the river. Trees grew here before the dam was built nearly 100 years ago.

A drop of pine sap glittered like a diamond against the dusty dry river bottom.

When we arrived, it was fun to explore never-before-seen {by us} river bottom. The gray rocky slope is the area that is normally underwater.

Crayfish skeletons were abundant.
Ancient tree stumps protruded from the original banks of the river. Trees grew here before the dam was built nearly 100 years ago.

A drop of pine sap glittered like a diamond against the dusty dry river bottom.

Crazy Road Trip Talking
I wish I had a tape recorder for all the funny road trip conversations overheard on our road trip. I can't make this stuff up. Here are a couple of examples.
While driving through a mountain pass east of Missoula on I-90:
Anna: "I call those the Hair Mountains".

Me: Why do you call them the Hair Mountains?
Anna: Because they have a lot of trees and plants and weeds and even grass.
Ehren: Well I call them the crazy hair mountains. {Ehren loved that there was a mountain range named "The Crazy Mountains." Dad pointed them out while we were near Bozeman.}

Bossy Anna: I decide what they're called. I decide because they're my mountains {pause to reconsider}. Ok, maybe we'll call them Anna and Ehren's Crazy Hair Mountains and be done with it.
And later... a different conversation with Christian:
Christian: Mom are we going to be in Montana all summer?
Me: No, just for a week, but that's almost the rest of the summer. When we get home, there will only be one week left before school starts.
Christian: Well, ok. How about two weeks then?
Me: Well you'd have to talk to my boss and Dad's boss about that.
Christian: How come you're not the boss?
Me: Because if I were the boss, I'd have less time to spend with you. I'd rather be your boss.
Christian: Mom, I still want to be a farmer.
Me: Well that's good because then you'll be your own boss. You'll have to wake up in the morning and tell yourself, "Christian, you need to work harder. Christian, you're going to to have to water today. Christian, there are a lot of weeds out in that field. You're going to have to do something about that..."
He was totally laughing. But I haven't deterred him from his farming dream.
Thursday, August 18, 2011
A Peck of Pickled Peppers
This spring, my dad bought a few packs of sweet orange bell pepper plants. It turns out they were mislabeled. They were actually hot banana peppers.

Since my parents do not eat hot peppers, guess what? Their loss was my gain. Here's Anna stripping the plants of their bounty.

I've been pickling hot peppers on and off for about ten years. It's actually quite easy. Pickling is safer and easier than other types of canning. The high acid environment of pickled products inhibits the growth of botulism-causing bacteria. Therefore, you don't need a pressure cooker for processing. My small batch took just over an hour from start to finish. If you want to try it, here's what you'll need:
Pickled Hot Banana Peppers
7 pint jars
7 sealing lids
7 jar rings
hot banana peppers (about an ice cream bucket full), washed and sliced into rings (stems cut off)
7 large cloves of garlic, peeled and cleaned
6 cups white vinegar
2 cups water
1 tablespoon plus 1 teaspoon pickling salt
1 tablespoon sugar

First wash your jars. You can wash and sterilize your jars in one easy step in your dishwasher. However, I never seem to time my dishwasher cycles right, so I just sterilize the old-fashioned way in boiling water. I don't have a proper canner, so I use my big stockpot for sterilizing and processing. Put a few inches of water in the bottom of your pot and flip the jars upside down. Cover the pot and boil for 10 minutes or so.

Meanwhile, start washing and slicing your peppers. Warning: Do not rub your eyes! Ever! You may want to wear gloves while slicing hot peppers because the oils get in your skin, and you can end up with burning skin for a few painful hours. I usually take my chances, but one year, my hands were in so much pain I could hardly sleep. Now I just try to avoid touching the seeds and juice as much as possible. Frequently rinsing your hands also helps.

When the jars are sterilized, turn them upside down on a clean towel to dry for a bit. Add more water to your canner (or stockpot, as the case may be), and bring it to a boil. At this time, mix your brine in another large saucepan (6 cups white vinegar, 2 cups water, 1 tablespoon plus 1 teaspoon pickling salt, 1 tablespoon sugar), and bring it to a boil. In a small saucepan, bring an inch or two of water to boil and then remove from heat. Submerge your sealing lids in this hot water (the heat will help them seal better when you put them on your jars).
When you are ready to pack your jars, add one to two cloves of garlic to each jar (depending on how big your garlic cloves are).

Spoon in the sliced peppers. Use the spoon to pack the peppers into the jars as tightly as possible. Don't be afraid to press them down! Leave about a half inch of head space at the top of each jar.

Pour boiling brine into each jar, leaving 1/4 inch head space in each jar. Use tongs to remove the sealing lids from their hot water bath one at a time and place a lid directly on each jar. Screw a ring onto each jar and tighten. Place your jars into the boiling water in your stockpot and cover the pot. Process the jars for 10 minutes (in altitudes above 6,000 feet, process for 15 minutes).

After processing, remove jars from the boiling water and allow to cool. After the jars have cooled, check the lids to be sure each one has sealed. Push down on the lid. If it pops, it did not seal. Jars that do not seal must be refrigerated and used first. For best flavor, store jars for six weeks before using.
Safety Tips for Pickling
- The level of acidity is essential for safety. Never alter the vinegar/water quantities in a recipe.
- Do not under-process your product. Adhere to the processing times in a trusted recipe. If you live at a high altitude, this will increase the required processing time.
- Cleanliness is very important. Make sure everything you use has been washed thoroughly -- the counter, your tools, the produce, and of course all the jars, lids, and rings. Sterilize your jars and keep the lids in hot water until the moment you put them on the jar.
- If you find a jar that lost its seal (the lid will "pop" when pushed) after it has been in storage, throw it out!
Uses for Pickled Hot Peppers
These pickled hot peppers are great in pasta salads and on pizzas. I also use them in smoked salmon and cream cheese appetizers (take a Wheat Thin, spread cream cheese on it, add a piece of smoked salmon and top with a hot pepper slice).

Notes on Canning Jars
I don't buy canning jars. I have inherited some from my mom. Others were saved from foods I bought at the store. If you have sealing lids and rings in your pantry, you can try them on an empty food jar before tossing the jar in the recycling bin. For pint size jars, I have reused the jars from mayonnaise, sauces, salad dressing, and certain brands of jams and jellies. Remember, you can reuse jars and rings, but sealing lids can only be used once.
Reference
The pickling process I have been using for the last ten years comes from the Colorado State University Extension office. I don't use the same varieties of peppers they describe, but otherwise I follow their pickled pepper recipe. Also, they say that the pepper recipe will make 7 or 8 pints, but I consistently find that the brine is only enough for seven pints (and there is no extra!). They also have an excellent list of food safety FAQs here.
Wednesday, August 17, 2011
Wordless Wednesday: Cherry Tomatoes and Dirty Fingers

Sweet 100 cherry tomatoes from our garden.
What kind of real gardner doesn't have dirt under his nails?
Monday, August 15, 2011
Photo Challenge: Beautiful Eyes


Anna gets those beautiful eyes from her grandma.

Actually, there are a lot of beautiful eyes around here. These are from Dad.
Sunday, August 14, 2011
Cool Cukes
Along with tomatoes, squash and other goodies from the garden, we eat a lot of refrigerator pickles this time of year. I make them just the way my mom taught me (thanks, Mom!).

Ingredients:
6-8 medium slicing cucumbers
1 onion
salt
ice cubes
1/2 cup vinegar (either white or cider)
1/2 cup sugar
pepper (optional)
celery salt (optional)
Directions:
Slice the cucumbers and onions into a large bowl. If the cucumbers are fresh and have thin skin, leave the skin on (more vitamins!). Sprinkle the top of the cucumbers with a generous amount of salt (3-4 tbsp). Put 6-8 ice cubes on top of the salt. Cover the bowl with plastic wrap and refrigerate overnight (or longer, up to 24 hours). Drain all the liquid from the bowl. In a jar with a tight-fitting lid, mix equal parts vinegar and sugar. Shake the mixture well until the sugar is dissolved (or nearly so -- sometimes it's hard to get it all completely dissolved). Pour the mixture over the cucumbers and stir. You can eat right them away, but it's better to let the cucumbers marinate in the vinegar mixture for at least an hour before serving. You can also add pepper and/or celery salt to taste. Be careful not to oversalt the pickles if you use celery salt. These will keep in the refrigerator for a couple of weeks, but they never last that long at our house.
Subscribe to:
Posts (Atom)